This week we ‘ve seen stories all around the web about a Dutch hacker ‘s demo of how easy it is to gain access to an iPhone when it is jailbroken, running the SSH service, and has not had its default admin-level passwords changed.
These stories were a great reminder that we should all make a habit of changing the default passwords for the iPhone ‘s two primary admin accounts (usernames mobile and root) “ as once somebody gains root level access to an iPhone, all sorts of bad things can happen.
Read on for some easy instructions on how to change your default passwords on the iPhone
How To Change The iPhone ‘s Default Admin Account Passwords:
*** These instructions assume you are running iPhone OS 3.0 or above on your device “ other firmware versions may vary in their default passwords. You also, of course, need to be jailbroken, and running the SSH service if you wish to use one of the methods that connect to the iPhone via a PC to make the changes.
You can use applications on the iPhone itself or on your PC to make these password changes. Please note “ you only need to use one of these methods, not all three.
Here are three walk-throughs for three common apps on iPhone, Mac, and PC:
Here are three walk-throughs for three common apps on iPhone, Mac, and PC:
On the iPhone:
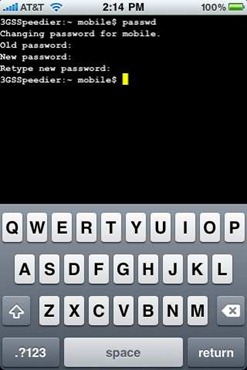
The app to use on the iPhone is called MobileTerminal and it ‘s available for free in the Cydia store.
Once you have MobileTerminal installed, launch it and you should see a prompt saying this or similar:
iPhoneName: ~ Mobile$
- At that prompt, type: passwd
- You ‘ll be prompted for the ‘old ‘ (current) password for the mobile user. Enter this as the old password: alpine
- You ‘ll then be prompted to enter the new password “ so just type in your desired new password. Use good password principles if possible (long and stong). You will not see characters appearing on the screen as you type “ that ‘s normal, not a concern.
- You ‘ll then be prompted to re-enter the new password. Do that.
- You should then be returned to the Mobile$ prompt that you started on when opening the MobileTerminal app. There ‘s no success message to say the password was changed “ but if you ‘re returned to the prompt and do not get an error, the change was successful. And you ‘re done with change for the mobile account.
- The second primary admin account for the iPhone is called root “ so now you need to change that as well.
- Type this to switch to the root user: login root
- You ‘ll be prompted for the root user ‘s current password. Enter this: alpine
- Type this to start the password change routine again: passwd
- Enter the old password for root (it is ‘alpine ‘, same as for the mobile user) and enter your desired new password twice, just as you did for the mobile account
Done.
On a Mac:
- Find your iPhone ‘s IP address so that you know where you need to connect to. To do this, go to the Settings app > WiFi > tap on the blue arrow to the right-hand side of the WiFi network you ‘re currently on (the one with a check next to it) > make a note of the IP Address entry listed there.
- On many home WiFi networks the address will be something like 192.168.1.x “ so we ‘ll use that in the command instructions below “ remember to use your own IP address when doing this though.
- Use the Terminal app or your favorite replacement for it (I use iTerm) and open a new window
- Type this to connect as root to your iPhone: ssh root@192.168.1.x
- You ‘ll be prompted for the root user ‘s current password. Enter this: alpine
- Type this to start on changing the password for the root user: passwd
- Type the old password (alpine) and new password (twice) as per the instructions above for the iPhone.
- Once you have changed the root user ‘s password, type this to switch to the mobile user: login mobile
- Type this to start the password change for this user: passwd
- Type the old password (alpine) and new password (twice) as per the instructions above for the iPhone.
- Type this to end your remote session with the iPhone: exit
Done.
On a Windows PC
Done.
As you can see, these are easy and fast steps to take. If you ‘re running your iPhone jailbroken and using the SSH service it ‘s very worthwhile to make these changes to the default passwords. Even if you do not use SSH, keep in mind that other core iPhone services may have security holes and exploits in future “ so the password change is a good idea all the way round.
If you are using SSH, another good practice is to keep the service always toggled off except when you are using it for file transfers or similar activities, and to get in the habit of shutting it off as soon as you ‘re finished working with it. The easiest way to do this is to use the excellent SBSettings app, to have a quick one-tap toggle on/off for SSH and other key services.
