顯示具有 Android 標籤的文章。 顯示所有文章

2012年12月5日 星期三

[ Game / Android / iPhone ] Blood Brothers Evolution Guide


Evolution allows you to mix two Familiars of the same kind to increase the stats, and rarity of a Familiar. Evolving a Familiar two or more times will change the Familiar and its skill.

Familiar Evolution

"By combining two of the same familiar, it is possible to create an evolved familiar that is stronger than the originals, with a different appearance. The rarity of some familiars may change after evolving, and it's even possible their initial stats may be lower. Rest assured that after gaining some levels their new stats will surpass the old."Taken from in-game Help


Formula

The evolution formula would look something like this:
  Spawn Stat
+ (Evolution Result Base Stat - Spawn Base Stat)
+ 5% OR 10% of Seed Stat
--------------------------------------------------
Evolution Result Stat
Taken from Comments.


Spawn

The Familiar to be evolved. The Spawn absorbs 5% of the Seed's stats (unless the seed is at max level in which case the Spawn absorbs 10%). The Resulting Familiar also inherits the level of the spawn, with increased stats (including empowered bonuses), crystal usage count, and a new look, name, and sometimes skill.

Seed

"The familiar used as raw material in an evolution is called the "seed." Once used, the seed is removed from your familiars. Only one seed may be chosen in each evolution." Taken from in-game Help
The new evolved familiar will inherit 5% of the stats (including empower bonuses) for non-max level seeds and 10% (including empower bonuses) from max-level seeds.

How to Evolve

"Tap a familiar to select or deselect it. Tap and hold on a familiar to view it's detailed stats. First choose the target familiar, or "spawn," then choose the seed. Gold is necessary to complete the evolution. Note that familiars currently in an [adventuring] party may not be selected."Taken from in-game Help

Multiple Evolutions

"A familiar can only evolve a limited number of times--the more star icons it has, the more it can evolve. Evolving twice increases the familiar's rarity and changes it's skills."Taken from in-game Help

Tips & Tricks

The following information has been obtained through trial and error, and some guesswork.
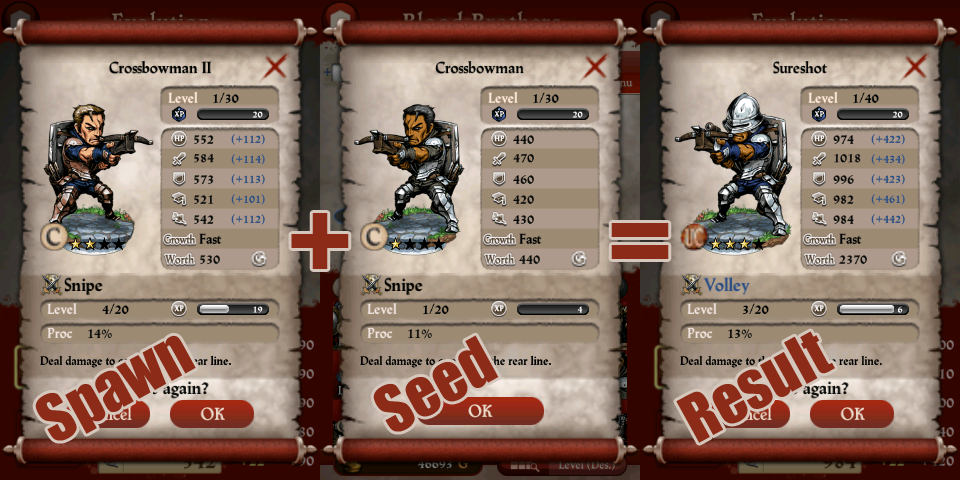
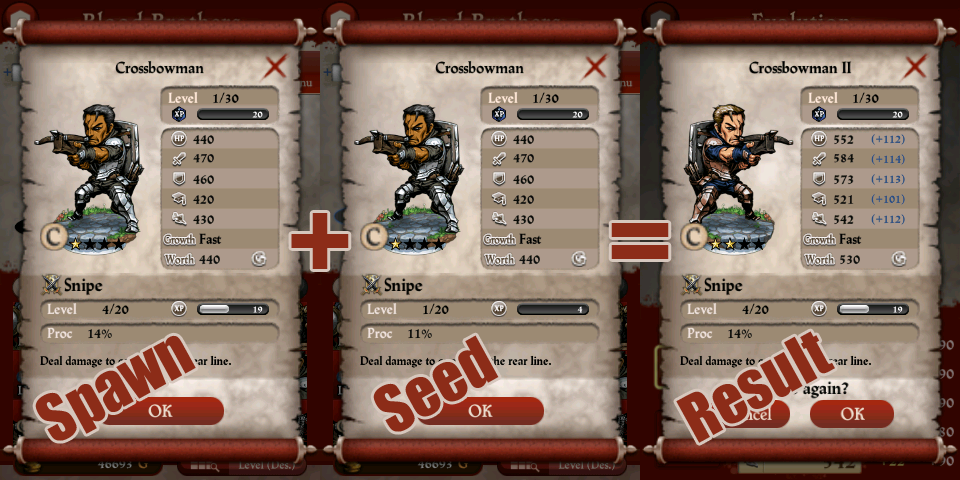
Evolved familiars inherit the Skill level of the Spawn. Be sure that your Spawn has the higher Skill Level. When the evolution results in increased rarity, the familiar may CHANGE SKILLS. The Skill Level of the Spawn will carry through but may be downgraded. The Spawn also retains it's level, however when upgrading in rarity (which includes an increase in level cap), this level may change slightly.
Crossbowman Evolution, Spawn with Skill
To illustrate the point of Skill level inheritance, take a look at this Crossbowman.
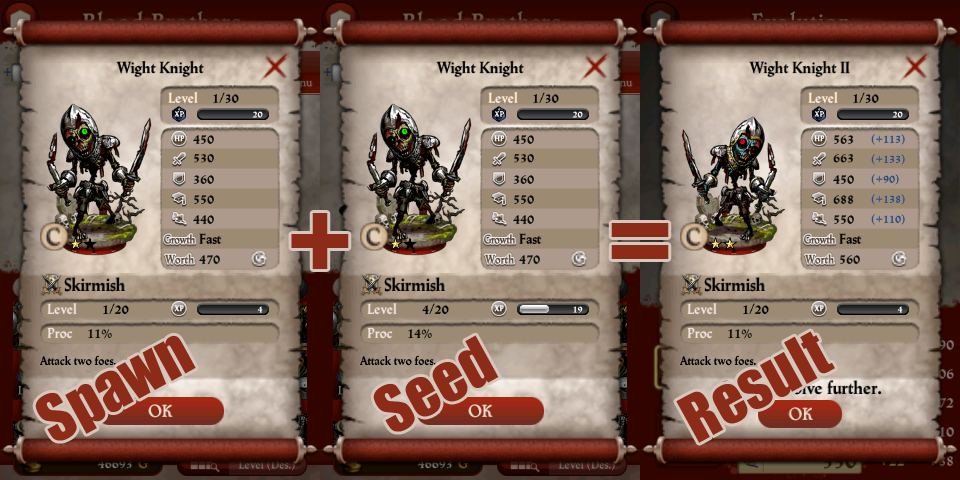
Wight Knight Evolution, Skilled Seed.
To further illustrate Skill Level inheritance the more skilled Wight Knight was placed as a seed.
Crossbowman II to Sureshot Evolution.
When the Skill level changes (a result with an odd number of stars), the Skill Level experience is still inherited from the Spawn. Due to some skills costing more expereince to level, the familiars Skill Level may change.
Both the Spawn and Seed can be at Max Lvl before evolving them. However the Spawns level does not reset upon evolution, The Seed should be at Max Lvl for the 10% stats transfer over to the spawn on top of the base evolution increase. Any stats increased by crystals on the seed will transfer based on the full value, meaning with 10 crystals on a stat you will transfer an additional 50 points. Getting a Two Star unit as a seed is less ideal than two One Star units that have been evolved at max level. This means to get the optimal stats for a final 4 Star Unit you will require eight 1 star units of that type. Each of those have to be leveled to their max before they are used as a Seed in the evolution.

Achieving Max Stats

EvolutionPath.png
Achieving Max stats requires 8 1-star versions of the Familiar. Four of those must be leveled to Max, and then used as the Seed for the other Four. Two of the Resulting 2-Star Familiars should then be leveled to Max (This will give max Stats for the 2-Star version), and then used as Seed for the two others. One of the resulting 3-Star Familiars should be leveled to max (yielding the 3-Star Max Stats), and used as the Seed for the other. The resulting 4-Star Familiar - when leveled completely will have Max Stats.
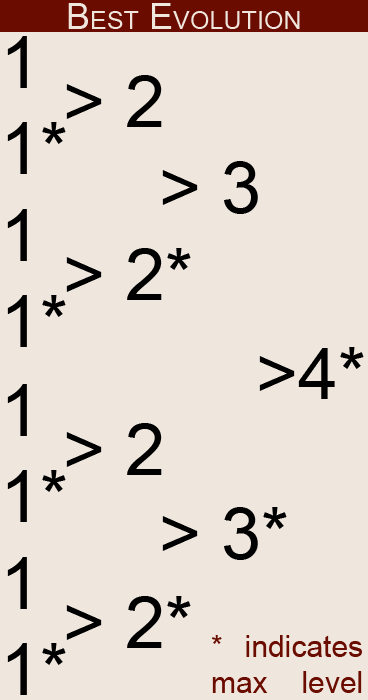
The stats reached using the method above should be the ones used on the Familiar pages.

For an added boost to your Familiars, use crystals as you see fit - If you have enough, put 10 of each crystal into each Seed familiar! (NOTE: This will only net you about 165 extra stat points more than just adding your crystals to the finished product, and will cost you 70 extra crystals per stat! Additionally, if one uses only 40 of each crystal on the proper familiars the final stats are only off from a perfect familiar by 15 in each stat. Please do not include Crystal enhanced stats on a Familiar page.

Web Development for Android / iPhone Devices: Mobile Joomla!


While many developers are actively working on an Android app for their client or business, others are going the web app route by creating websites that look and act like apps when viewed on mobile clients. If you're already using the Joomla! CMS, the Mobile Joomla extension will do most of the work for you, as we will show you in this tutorial.
Mobile Joomla is a free extension that works like this: if you visit a Mobile Joomla-ready website using your desktop web browser, you will see the site like you always do--a normal, standard Joomla! site. If, however, you are using an Android or WAP device, iPhone or iPad, you will see the same website appropriately displayed for your device. It allows you to redirect mobile users to a specific subdomain, or it can use a specific theme for each device. That allows Android users to see one thing, iPhone users another, and Windows Phone 7 users to see something altogether.
You can see it in action by checking out my own test site which I created as I wrote this article,AndroidWho. View it in as many devices as you have access to, and you will see an immediate difference (or, if you are using an Android device running the Dolphin HD browser, you can change the user agent to Android, Desktop, iPhone or iPad, and check it out that way).

Setting Up My Test Site: AndroidWho.com

For this tutorial, I created a site from scratch. I bought the domain name AndroidWho.com, and set it up with my webhost, 1and1.com. Once I had pointed the DNS records to 1and1.com, and created a home directory for the new domain, I created a new MySQL database to use with a fresh Joomla! 1.6 installation.
I won't bore you with the Joomla! installation details, as we have already covered the topic in detail here on HTMLGoodies. Suffice it to say, once you have created the MySQL database, it's pretty much plug and play (or fill in the blanks, more precisely). Here's what my fresh Joomla! installation looked like when it was installed on my host (and yes, I did install the sample data that's included):
Fresh Joomla Install
Since I am not the type of person who can just leave things in their default status, I looked around and found a Joomla! theme that looked more like something an Android nut like myself would like. It's called Modern Design and was available for both Joomla! 1.5 and 1.6, so I was set.
Again, we have already discussed how to install a Joomla! theme, so I won't go over the details, but once I was done installing the theme (and assigning modules to positions within that theme, etc.), the site looked a bit better:
Modern Joomla
Now we get to the installation of Mobile Joomla itself. Mobile Joomla is free to download, and the Mobile Joomla website includes ample documentation:
Modern Joomla
As I mentioned before, I installed Joomla! 1.6, rather than the 1.7 release candidate, because the folks at Mobile Joomla are still working out the issues of upgrading to support the new Joomla! release. They have their own release candidate coming out with support for 1.7, but we'll leave that for a future article.

Mobile Joomla Installation

Before you begin the installation, make sure that your webhost has the following features or configurations:
  • PHP 5.0 (but you need PHP 5.2.4 or higher to run Joomla! 1.6)
  • MySQL 5.0
  • Joomla! 1.5 or 1.6
  • GD2, a PHP image library for image scaling
  • Zip PHP extension
  • bzip2 (PHP bz extension for TeraWURFL device database, explained below)
  • mysqli (also for TeraWURFL)
  • 100 MB of database disk space
  • at least a 64 MB PHP memory limit
Also, one part of Mobile Joomla, TeraWURFL, takes up around 25Mb in the MySQL database, so you'll need enough space for it to be installed. TeraWURFL is where the information (the user agent data from just about every mobile device out there) is stored, and it's required for Mobile Joomla to function.
While Mobile Joomla works on most web hosts, GoDaddy is known to have issues, so be forewarned. Now, let's begin.
Once you've downloaded the Mobile Joomla file itself, you just need to un-compress it (the actual file you'll be using is a .tar file), and Joomla! enables you to simply upload it as is by using the Extension Manager, as shown here:
Extension Installation
Once it's installed, you can either leave it as it is, or further customize it. Here's how that same page we showed you above appears now when viewed by someone using an iPhone:
iPhone View
And here it is on a WAP device, such as a Nokia 6630:
WAP View
Here's what it looks like on a 7 inch Android tablet, through the default browser:
Android View

Changing the Mobile Joomla Configuration

To really dig into the Mobile Joomla settings, just to to the Joomla! Administration page, Components, Mobile Joomla!, Settings, as shown below:
Mobile Joomla Settings
Once you're in the Mobile Joomla! settings, you will see an interface with 5 tabs: Global settings, Smartphone (XHTML), iPhone, WAP and iMode. On the General settings tab, you can enable or disable caching, browser caching, and subdomain support (you can point each type of mobile device to a device specific subdomain, such as iphone.androidwho.com). On the iPhone tab, you can choose to select iPad support, image scaling, and the modules that are used for the iPhone display. You can see the iPhone tab below:
iPhone Settings
There are too many options to list in this article, but suffice it to say, you can style the display for each device however you want, and completely customize your website's appearance by changing the settings. By default it works very, very well, and I am looking forward to seeing the next version of Mobile Joomla!, as it promises to support the Joomla! 1.7, with updated mobile functionality.

2012年7月3日 星期二

Android 4.1 加入安全模式功能


  如果你是 Windows 的使用者,應該都知道安全模式有什麼作用,它能夠不載入第三方程式的情況下啟動設備,是修復系統錯誤的專用模式。而來到新一代 Android 4.1,Google 也將原有的「安全模式」開放給一般用戶使用,只要如常按電源鍵關機,接著在「關機」一欄長按就會出現進入「安全模式」的提示視窗,同樣地,所有已安裝的第三方應用程式會停用,雖然表面上看來是針對開發人員和進階用戶而設,不過如果在手機沒電的情況下,接下來的工作只是上網或收發電郵,進入 安全模式相信可節省不少電力。

2012年5月30日 星期三

將你的 Android 手機換上 XPERIA S 的介面

Source: http://www.android-hk.com/applications/xperia-s-home-launcher/


Android 的主介面,絕對是手機用戶一天看得最多的畫面,若然不夠美觀,或者因日子久了自然欠缺新鮮感,都會令用戶變得很沒趣。不過只要裝上今次為大家介紹的《 XPERIA S Home Launcher 》,就能將大家的 Android 手機換上以華麗、流暢著稱的 SONY XPERIA S 主介面,讓舊手機煥然一新。

▲ 用家只需到以下地址下載最新版本的 XPERIA S Home Launcher,之後就如平常安裝 APK 一樣。
 
▲ 開發者更附上了 XPERIA S Home Launcher 專用的小工具,美觀而實用。在同一的下載頁面,下載及成功安裝右邊所有 Widget 的 APK 及 WidgetPicker,在小工具列表中就會出現剛安裝的 Widget。

▲ 介面十分流暢,佔用 RAM 不多。

▲ 應用程式可以按使用者選擇的方式來排序。(左下角icon)

▲ 也可以按右下角的 Icon 進入管理頁面快速移除應用程式。

▲ 雖然這個介面是從 Xperia S 提取出來,但經開發者的改進,用戶已經可以在介面設置裡調較所喜歡的設定,如頁面數目、欄列數目等,甚至提供備份功能,自由度不比第三方 Launcher 差。
總結:
貴為 SONY XPERIA S 的介面系統,質素當然有一定保証,現在有 XDA 論壇的高手把這個介面移植到其他 Android 手機,實在是其他手機用戶的喜訊。而且新版本完成度相當高,經筆者測試後並沒有出現任何錯誤,流暢度又高,介面華麗且穩定,實在值得一試!(筆者測試的手機為 LG Optimus 2X 及 Galaxy Nexus)
費用:免費
檔案大小:隨用戶選擇而定
目前版本:0.9.1
支援機種:2.3 以上

《小米桌面》無需刷機即享 MIUI 體驗


MIUI 自發佈以來受到不少刷機發燒友的喜愛,目前已經擁有了過百萬的用戶,受歡迎程度可見一斑,但以往要體驗 MIUI 都需要刷機,對一般使用者有著一道高門檻。不過現在小米也終於照顧其他手機使用者,推出以 Launcher 形式的《小米桌面》,依然繼承了許多 MIUI 的各項特點,只要你的手機是跑 Android 4.0+ 系統,從此要玩 MIUI 就無需刷機了!

▲ 採用環形解鎖介面設計,可以向四個方向拖拉,分別是相機、短訊、解鎖和電話。
 
▲ 小米桌面沒有一個程式列表,所以程式圖標都放在桌面上。

▲ 此桌面只是一個 Launcher,沒有許可權限修改原生通知欄, 所以利用 Widget 來取代 MIUI 通知欄快捷開關功能。

▲ 保留 Android 4.0 原生的資料夾功能,只要按住桌面上的程式圖示,並與其他相疊,就可以自動形成一個資料夾。

▲ 長按桌面任何一個位置,就可以看到所有的 Widgets 都在下方,透過左右滑動選擇,然後長按就可以拖拉到桌面上。
 
▲ 支援 MIUI 介面、鎖屏主題功能,提供8000餘款免費主題任下載。
 
▲ 小米桌面暫時沒有提供足夠的自訂空間,能調整的選項不多,最特別都是提供8款轉頁效果選擇。
用後感:
小米桌面的最大特色是百變主題和鎖屏,擁有全球最大的主題庫,對於喜歡新鮮個性的使用者是最吸引的地方。而流暢度方面也有相當好的表現,但穩定性則有待加強,在程式跳回桌面時經常彈出「沒有回應」。另外,要抱怨的是它借鑒了 iOS 的設計,捨棄了 Android 的「桌面 + 程式列表」的組合,令到使用者控制桌面的彈性大減,也需要花大量時間整理 Apps 的排列。
費用:免費
檔案大小:5.25M
目前版本:1.0
支援機種:4.0 或以上

2012年3月20日 星期二

Galaxy S II Android 4.0 更新開始

Samsung 在今天開始,正式為 Galaxy S II 提供 Android 4.0 的升級,只要將您的手機通過 USB 連接到 PC,在 Kies 軟體就會看到相關的更新通知,然後跟著提示步驟便可為 Galaxy S II 升級到 Android 4.0.3 版本,最後,進入設定介面,如版本號碼出現 IML74K.ZSLPE 的字樣,即代表更新完成,快點檢查吧!
Galaxy S II 的 Android 4.0 主要更新功能如下:
  1. 新增臉容解鎖功能
  2. 修改Screen Capture 方法
  3. 新增話音輸入功能
  4. Gmail功能提升
  5. 新增用戶數據管理
  6. 新增多項作業管理介面
  7. 網頁一頁盡覽,快速切換桌面及手機版網頁

2011年4月8日 星期五

Android上使用SSH tunnel翻墙

目前大部分的手機翻牆都是用的VPN,如果可以實現SSH Tunnel,我就可以像PC那樣利用美國的主機服務了。 还需要探索一下。 還需要探索一下。 这篇文章是个很好的引子。 這篇文章是個很好的引子。

目前在PC上使用SSH tunnel翻墙是一个相当广泛使用的方案,国外SSH帐号的获取不是太难,购买起来价格也比VPN帐号要便宜。目前在PC上使用SSH tunnel翻牆是一個相當廣泛使用的方案,國外SSH帳號的獲取不是太難,購買起來價格也比VPN帳號要便宜。 但是在智能手机上目前还不能使用SSH方案,只能用VPN。但是在智能手機上目前還不能使用SSH方案,只能用VPN。 Android系统是基于Linux的,特别是root了之后,基本上要玩什么都随心所欲了。 Android系統是基於Linux的,特別是root了之後,基本上要玩什麼都隨心所欲了。 因此Android上是应该也可以使用SSH tunnel的。因此Android上是應該也可以使用SSH tunnel的。

 先看看Windows上是怎样设置SSH翻墙的:先看看Windows上是怎樣設置SSH翻牆的:
  • 首先需要有个支持dynamic port forwarding的SSH client,这个SSH client能开放出SOCKS服务首先需要有個支持dynamic port forwarding的SSH client,這個SSH client能開放出SOCKS服務
  • 如果浏览器(或者其他程序)支持使用SOCKS proxy,设置使用SSH client开放出来的SOCKS端口,就可以使用了如果瀏覽器(或者其他程序)支持使用SOCKS proxy,設置使用SSH client開放出來的SOCKS端口,就可以使用了
  • 如果浏览器(或者其他程序)不支持SOCKS proxy,只支持HTTP proxy,就需要再运行一个支持SOCKS的代理程序(例如Privoxy),将HTTP转成SOCKS如果瀏覽器(或者其他程序)不支持SOCKS proxy,只支持HTTP proxy,就需要再運行一個支持SOCKS的代理程序(例如Privoxy),將HTTP轉成SOCKS
在Android上就要麻烦一点了,因为需要网络通讯的不仅仅是浏览器,很多Android application都需要访问网络,但是它们并不支持proxy——连HTTP proxy都不支持,更不用说SOCKS了。在Android上就要麻煩一點了,因為需要網絡通訊的不僅僅是瀏覽器,很多Android application都需要訪問網絡,但是它們並不支持proxy——連HTTP proxy都不支持,更不用說SOCKS了。 它们只会直接连接目标站点,如图中虚线所示,然后撞墙。它們只會直接連接目標站點,如圖中虛線所示,然後撞牆。

但是Linux有iptables,可以设置iptables规则(需要root权限),将HTTP/HTTPS请求forward到一个transparent SOCKS proxy去。但是Linux有iptables,可以設置iptables規則(需要root權限),將HTTP/HTTPS請求forward到一個transparent SOCKS proxy去。 transparent SOCKS proxy的作用是将任意TCP连接转成SOCKS连接,这样就可以走SSH tunnel出去了。 transparent SOCKS proxy的作用是將任意TCP連接轉成SOCKS連接,這樣就可以走SSH tunnel出去了。 我分析过几乎所有的Android应用访问网络都是走HTTP/HTTPS协议的,所有仅仅处理HTTP/HTTPS就够了。我分析過幾乎所有的Andr​​oid應用訪問網絡都是走HTTP/HTTPS協議的,所有僅僅處理HTTP/HTTPS就夠了。
Android上支持dynamic port forwarding的SSH client有ConnectBot ,不过ConnectBot是一个有界面的应用,似乎不能由其他程序来控制,这样就不好做到翻墙软件的傻瓜化了。 Android上支持dynamic port forwarding的SSH client有ConnectBot ,不過ConnectBot是一個有界面的應用,似乎不能由其他程序來控制,這樣就不好做到翻牆軟件的傻瓜化了。 应该还是弄一个命令行的ssh client更合适。應該還是弄一個命令行的ssh client更合適。

在网上搜索了一下,开源的transparent SOCKS proxy有几个: transocks_evTranSocksredsocks在網上搜索了一下,開源的transparent SOCKS proxy有幾個: transocks_evTranSocksredsocks从文档上看,似乎transocks_ev比较适合。從文檔上看,似乎transocks_ev比較適合。

但是,我现在面临的困难在于我不熟悉如何交叉编译Android平台程序(C语言),了解了一下如何搭建Android交叉编译环境,似乎挺麻烦(对我而言)。但是,我現在面臨的困難在於我不熟悉如何交叉編譯Android平台程序(C語言),了解了一下如何搭建Android交叉編譯環境,似乎挺麻煩(對我而言)。 而且要让普通Linux上可运行的sshd和transocks port到Android上,也许还有一些代码要修改。而且要讓普通Linux上可運行的sshd和transocks port到Android上,也許還有一些代碼要修改。 不知道有没有Android系统高手能够帮忙?不知道有沒有Android系統高手能夠幫忙?

題外話~
四個實用SSH and Telnet android app如下;
1. SSHtunnel
2. connectBot
3. Better Terminal Emulator Android
4. Android Terminal Emulator

2010年12月16日 星期四

App Inventor for Android 正式公開測試

於 7 月時曾經介紹過的 App Inventor for Android,日前終於以公開測試的形式推出,並開放給予公眾下載。簡單來說,App Inventor 是一套 Android 軟件開發工具,最特別的是,用家不需要懂得任何程式語言都可以製作一款簡單的 Android 軟件,而製作過程只涉及簡單拖拉及設定的步驟。

今次 App Inventor for Android 公開測試版已經支援 Windows、Mac 及 Linux 系統,而且該網站內有不少教學資源,適合像筆者般的新手使用。惟一要挑剔的是,大家不可以透過 App Inventor 直接修改程式中的編碼,不便於優化程式及臭蟲修正等工作。

App Inventor for Android 網址:http://appinventor.googlelabs.com

via: googlesearch blog

Nexus S Live Wallpapers Extracted

XDA member dapoharoun brings us the joy of the upcoming Nexus S even before its official release. It seems that we are always eager to get our hands in the latest, even if the latest is still some time away. This time, we have the LWP (Live WallPapers) from the Nexus S, which runs on Gingerbread. Little by little, all the new improvements from this device will start bleeding down onto the older devices, which are eagerly waiting for the official release of this OS.
The thread has instructions on how to install the LWP, so make sure that you follow them unless you want to get in trouble. Please post any feedback that you may have about the app.


Instructions:
  1. Download the Nexus S livewallpaper.apk
  2. Copy the file to your SD-Card
  3. Open “Root Explorer”
  4. Do a backup of your “livewallpaper.apk” in “system/app”
  5. Copy the Nexus S “livewallpaper.apk” to “system/app”
  6. Reboot
  7. Enjoy
Credits : the3dman
You can find more information in the wallpaper’s thread.